
Hey all, we've been using Warcraft Logs for a while now and it's been very useful for seeing a record of our past raid fights. Some folks may not yet know all of the cool other features Warcraft Logs has to offer or some of the ways you can analyze the data, so I thought I would put together some tips and great ways to get valuable information from this resource!
Basics: Analyzing your own performance for a particular fight
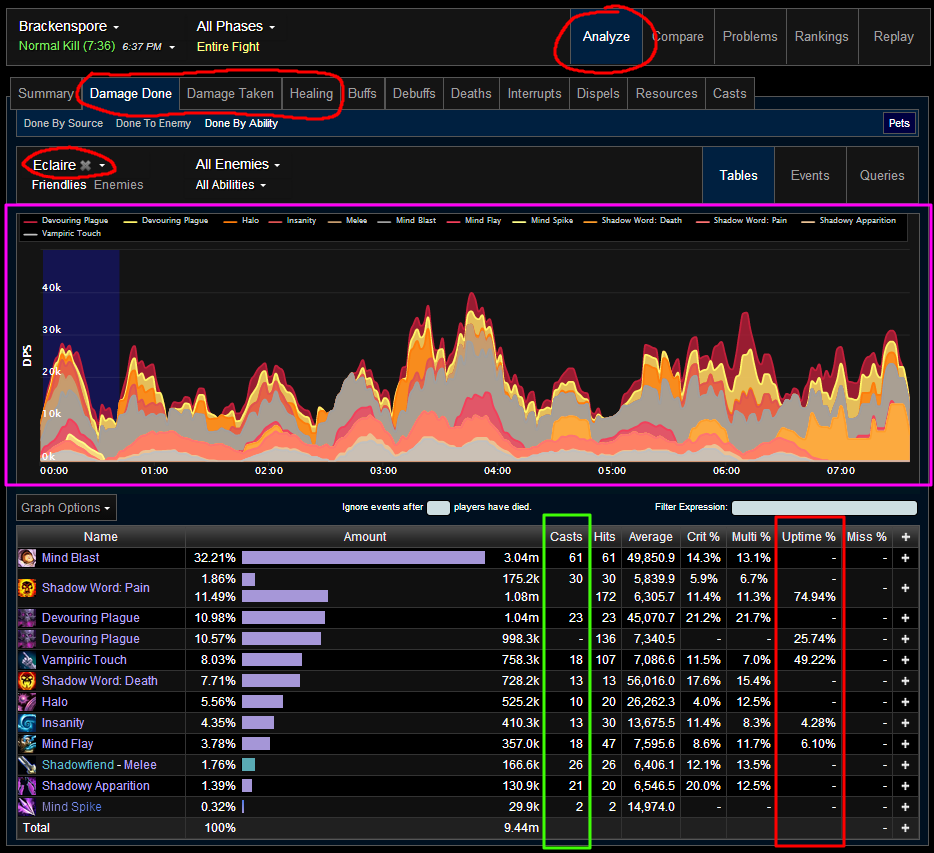
Here's an example of our Brackenspore normal fight on sunday where I played as shadow and was on flamethrower duty. Circled at the top is where you'll want to navigate to in the upper menus to reach a breakdown like this. Make sure you have the right boss and attempt # selected at the very top also.
In the magenta highlighted area, you'll be able to analyze at which points in the fight you were using each of your abilities. Clicking on a spell at the top, for example "Devouring Plague", would toggle the visibility of that ability on the graph. So for instance if I want to see at which points I had Shadow Word: Pain up, I would make sure only Shadow Word: Pain was highlighted and I could then see the parts of the fight where I failed to keep it up.
In the green highlighted area, you'll see the number of times a spell was casted. This is great for seeing if you slacked off on using some of your spells as much as you should have.
For example: I used Halo 10 times during the fight and Halo is on a 40 second cooldown. I can see at the top that the fight was 7:36 minutes long. Doing some quick math ( [60*7 + 36] / 40 = 11.4) I can tell that I should have been able to cast Halo 11 times if I was using it on cooldown. In this case I consider that to be pretty close to maximum, since I was also doing flamethrowers, so I'm fairly satisfied with that number. However, if my logs had shown I had only casted it half as often as I should have (like 5-6 times), then I would know it is something I needed to work on during that fight.
In the red area, is the uptime percentage of your spells. This is particularly critical to look at if you're a class with DoTs or HoTs. For example I can see in the above image that my Shadow Word: Pain uptime was only 75% and Vampiric Touch was under 50%. In theory I should be able to keep both of my DoTs up 100% of the time on the boss or adds, even while I'm on flamethrower duty, so that's something I could improve on next time.
Basics: How was my mana/rage/energy?
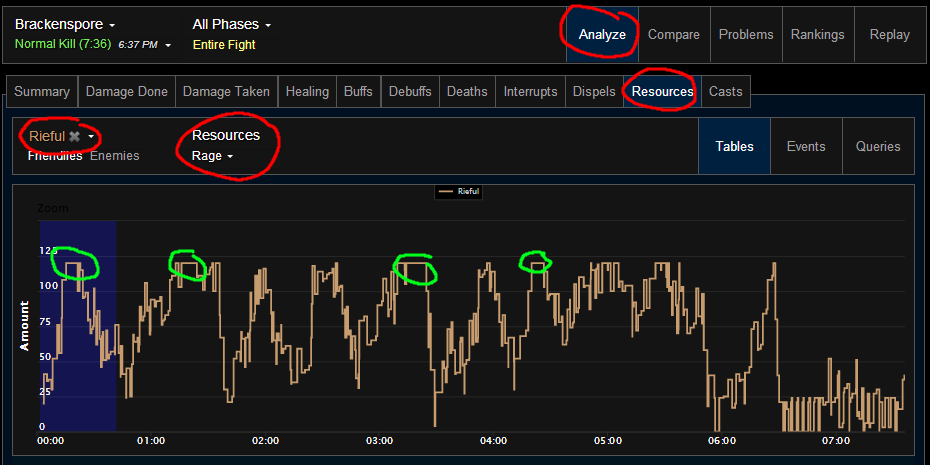
Another cool thing for energy, rage, and mana users (healer) that you can see is how well you utilized your resources throughout the fight. Circled at the top is how you'd navigate to a screen like this. I'm using Rieful (dpsing) as an example since warriors use rage.
So, to analyze a graph like this you'd need to first know a little bit about warriors. A quick summary: rage is used for abilities, so it is never a good thing to be at max rage for too long because it means you're spending some time not using your damaging abilities when you could be. Also, when the boss reaches 20% health they are in Execution rage, and warriors should be spamming execute instead of using anything else. Execute is an ability that uses up all your rage to do massive bonus damage to the boss at the end of the fight, which explains why rage numbers are very low for the last minute of the fight in the chart
In this particular chart there are a few small periods circled in green where rage was capped briefly, but overall rage usage looks to be not too bad. Also, it's clear that at about the 6:30 mark, rage was properly used on executes, so another good job on that front. If on the other hand there were many rage plateaus on the chart (especially at the end of the fight), as a warrior you could then conclude that rage was not being spent properly or quickly enough on damage abilities to maxmize your performance.
This same graph works for healers who want to see how their mana fluxuated during the fight (or how quickly they ran oom), and for rogues or hunters who want to see how often they were maxed on energy and wasting some valuable active time.
How did I do compared to other people (globally) close to my gear score and spec on a particular fight?
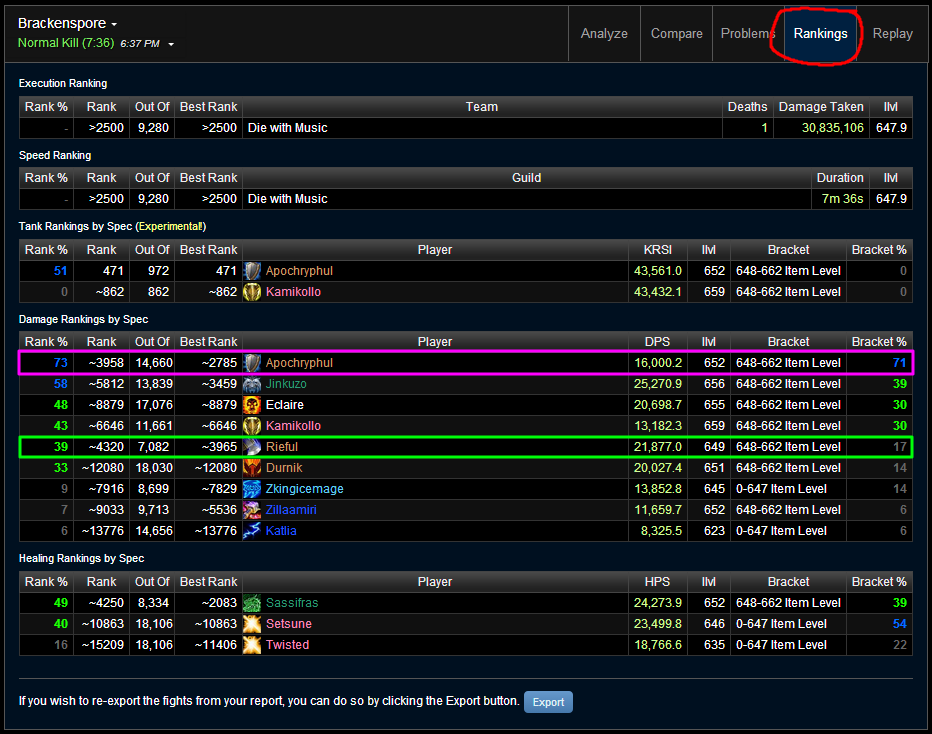
Now the real nice way to see how you are performing in comparison to all the other people of your class and spec and gear bracket is by viewing the Rankings tab circled at the top. This can be very useful for analyzing how you're performing in comparison to other people of your role, rather than to just the other DPSers/Healers in your raid. Since we all know some classes are stronger for some fights over others, it's easy to think that an Warrior doing 25k DPS is performing better than a SPriest doing only 20k DPS, but rankings may actually tell you that the priest is performing on par for his/her spec on that fight.
For example, highlighted in magenta is Apoc's prot warrior DPS performance, which was 16k DPS. Although it is lower than the other DPS's numbers, it is ranked relatively high for protection warriors on this fight.
Below it highlighted in green is Rieful's arms warrior performance, which although pulled 21.8k dps, was only about a middle of the pack when compared to other arms warriors in that fight. However, it is worth noting that Rieful's gear score is on the lower end of his bracket (due to being ilevel 649 in the bracket of 648-662), which is shown on the right column, and is important to factor in. Considering that he is in the lower 17% of his gear score bracket but performing better than 39% of all warriors total, we can consider that still fairly good.
EDIT: Because I made a typo up in the previous section and my explanation is unclear, let me re-iterate that the left-most column is your ranking overall among ALL players of your class in any gear score bracket. The column on the right showing Rank % is actually your performance ranking just for the particular gear score bracket which you're placed.
Another example: Let's say Bob is a hunter, and Bob's gear score is 660. His gearscore puts him in the 648-662 bracket. His Bracket% is 90, but his overall Rank% is 50. All this means is that for Bob's gearscore, he is performing better than 90% of other hunters with a gear score of 648-662. However, when compared against all hunters including those that are lower than 648 and higher than 662, Bob is in the middle of the pack performing better than about 50% all hunters on Warcraft Logs.
Where did I screw up during the fight?
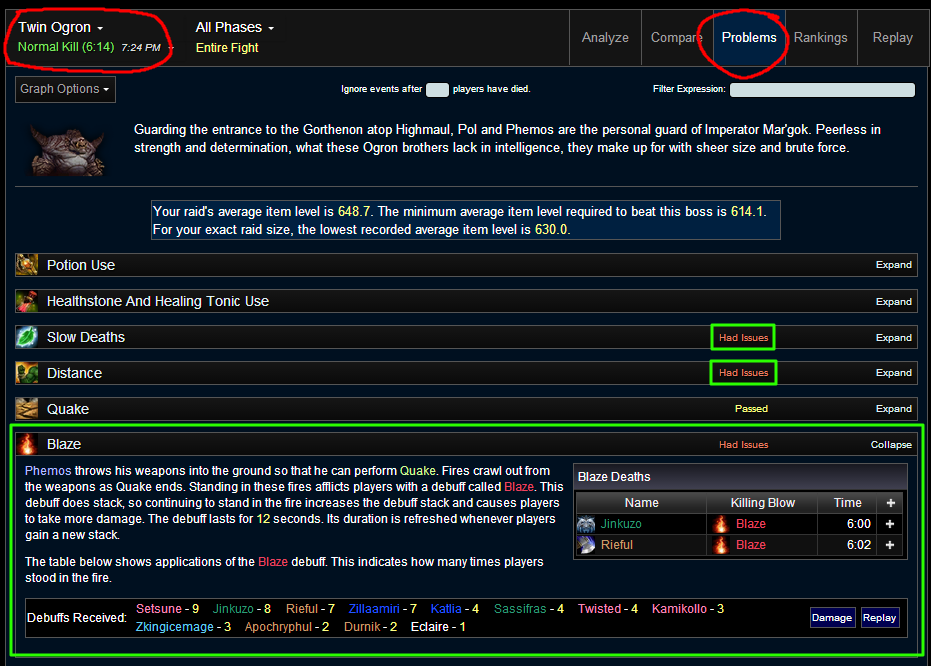
A real cool feature of Warcraft Logs is that you can actually see where you had problems for any particular boss attempt. Here is a view of the Twin Ogron attempt for our kill on Sunday as example. Circled at the top is the tab for "Problems" which would take you to this kind of view.
Warcraft Logs will mark areas which your raid had issues highlighted above in green, and in this example I've expanded the "Blaze" category (fire from the quake). It tells you neatly who died as a result of blaze, and who got hit by the fire and how many times throughout the fight. This is great for figuring out if you need to work on avoiding a particular mechanic for any particular boss. It's worth noting though that some people might not be able to avoid the fire all the time, for example the Phemos tank.
You'll also notice at the top of the list is "Potion Use" and "Healthstone and Healing Tonic Use". This is good for figuring out if you hit a healthstone during the fight if you should have, and whether you remembered to pre-pot, etc.
To be continued... next topics will include:
"Basics: Analyzing my active time"
"Browsing the ranks: Comparing your performance with higher ranked players of your class and spec and improving"
"Browsing the ranks: What talents and glyphs should I be using for this fight?"
"Watching replays: Analyzing our raid's positioning and strategy in real time"
"Watching replays: What strategies are other top ranked guilds using?"
Finally, let me know if there's any other topics I should cover or if there's anything I missed. Hope it's useful for some folks. I'll be working on this a bit more and adding to it when I have the time.
One thing of note: At certain points, your bracket ranking will go from really high to really awful but that's not always your fault or an issue. I went from 80% to 20% on a couple fights because I went from 'best geared in bracket A' to 'worst geared in bracket B'. It doesn't mean you're suddenly terrible, it just means you're competing with bigger and better people
I'm switching from Fury to Arms on my warrior since I finally got a semi-usable 2hander so I may use that as an example for using logs to find areas to improve, at least using LFR logs
Bonus for Lockstars out there: http://us.battle.net/wow/en/forum/topic/15538506318
Yep, check above for my edits to the section about rankings. I corrected my errors explaining that part and added a new example. Sorry about that!
A quickish example of how I check logs to see how I'm doing
Preface: As Demonology, my main rotation/priority is to =>
(*Demonbolt works like Arcane Blast; each time you cast it, you get a debuff that makes it cost more but hit harder. The debuff keeping stacking and around 4 stacks you have to stop casting and let the debuff fall off before the next burst)
With that in mind, I went into our recent log and selected those buffs/debuffs to see how I did. One of the reasons I like setting up the layout this way is because I can toggle through boss fights/attempts and the graphs will update automatically for the new fight. That makes it much faster to look through different attempts and see consistent issues
So with that, this may look a little hectic but bear with me...
1) So the first two rows track my Metamorphosis and Dark Soul buffs. I popped Meta 6 times and DS 5 times. At the YELLOW STAR, you can see I popped Meta during my opener but I didn't pop DS. Because DS is a minute CD with 2 charges, I had enough time to pair it with my Meta but I didn't. This was an issue on Butcher and because of the way I made the layout, I could look at Kargath briefly and see the same issue. Now I have one area I can try to improve on
2) The next 2 rows track Corruption and Doom, my 2 DoTs. Both Corruption/Doom were up almost the entire fight and while they both dropped once, they were re-applied quickly. So this part looks correct and I'm happy with how I did
3) The next two graphs track my Demonbolt debuff and my Demonic Fury. This part is trickier than the other two because a lot of factors can affect it. You can see I cast Demonbolt twice in my opener and stay at 2 stacks. At RED STAR, I actually cap on fury at 1000 which I shouldn't have let myself do, but I do start casting demonbolt shortly after that. I don't cap on fury afterwards which is good, but you can see I only cast Demonbolt 3 times in the third set instead of four, which isn't ideal either. Looking at my Demonic Fury, I can tell that I was just barely under the 320 I needed for a fourth cast. The rest of the fight looks the way I want it to though, building up to >800 fury and casting 4 Demonbolts. An area for improvement then(**)
4) The large graph is the Hand of Guldan debuff stacks on Butcher. My goal was to get the debuff on the boss for as long as possible while making sure it stacks to deal extra damage everytime. At BLUE STAR you can see there's a slightly longer pause which probably means I sat on both charges for longer than I should have. But it wasn't that long and I was consistently stacking twice which I struggle with sometimes, so I'm happy with this
And that's how I did on Butcher. As I mentioned above, I can select a different attempt and the graphs will update and I can glance through quickly and easily to see what I struggle to do consistently. If I want to know more, I can look up specifics or even the replay of the fight to see where/what I was doing during the fight. But for now, I can feel happy that I know what I've got a handle on and where I still have issues
** I mentioned 2 issues with my Fury/Demonbolt during Butcher. I was curious why I did that, so I looked at the replay and realized those are times when the Butcher did his knockback. The first time, I let my Fury cap because I didn't to waste Fury idling in Meta while I got knocked back and repositioned. I had the opposite issue later on when I only cast 3 Demonbolts. I popped Meta early and lost enough Fury during the knockback and repositioning to be just shy of the 320 I needed. Now I know what caused the issues and what to watchout for next time I'm on him
________________________________________________________________________________________
Keep in mind, I haven't even looked at ACTUAL NUMBERS here. All I did was look graphs for my core mechanics to see if I was doing well and what I struggled with so I know what to work on. I can get value while keeping it simple
Bonus: Anytime you're looking at a log and see my Hand of Guldan be two single-stacks instead of stacking it up to 2, that means I missed my window to maximize its damage/duration. That is also the precise moment you would have heard me go "!@#$" if I had my mic on